

AI Summary
|


A website relaunch is one of the highest-risk moments in a site’s lifecycle, which is why website relaunch SEO needs to be planned before launch. Within 72 hours, you can lose 10 to 30 percent of organic traffic. Rankings that took months to build can disappear from search results overnight. Backlinks may suddenly point to dead pages, while internal link signals scatter across a new architecture.
But none of this is inevitable.
The difference between a relaunch that recovers in 30 days and one that limps along for six months comes down to one thing: preparation. This guide walks you through every decision point, from the pre-launch audit to the first 30 days of monitoring, so you can migrate your site without sacrificing the search visibility you’ve already earned.
Key Takeaways
- Website relaunches cause a temporary ranking and traffic dip (10-30% in week 1) that recovers in 30-90 days if executed correctly. Poor execution extends recovery to 6+ months.
- The single highest-impact action is a pre-launch URL mapping spreadsheet with direct 301 redirects for every changed page. Without it, recovery becomes reactive and prolonged.
- Parallel ranking losses occur when old and new sites are indexed simultaneously. You must prevent this by retiring the old site’s crawlability (via robots.txt or takedown) within 48 hours of launch.
- Core Web Vitals degradation is the most common cause of post-relaunch ranking drops that don’t recover. New designs frequently introduce render-blocking JavaScript, uncompressed images, or insufficient caching. Test before launch; don’t debug after.
- Daily monitoring for the first 30 days is non-negotiable. A 20%+ traffic drop, zero new-page indexation after 72 hours, or 30%+ keyword ranking drops signal fixable issues if caught within 48 hours.
Why Website Relaunches Fail SEO (And How to Prevent It)
Website relaunches are one of the highest-risk SEO events a business can execute. Unlike incremental changes or seasonal campaigns, a relaunch is a binary moment: you either preserve your search visibility or you lose it. Understanding what breaks, when it breaks, and how to stop it breaking is the difference between a one-month recovery and a six-month crisis.
The Cost of Getting Relaunch Wrong
Traffic loss during relaunch is measurable and avoidable. The most common post-relaunch outcome is a traffic drop of 20–40% in the first 7–14 days. For a site earning 10,000 organic visitors per month, that translates to 2,000–4,000 lost visits per week. If your site earns £50 per visitor in net revenue, a 30% traffic loss costs £500,000 in foregone revenue over four weeks.
That cost is recoverable, but only if the relaunch was executed correctly. A site with proper redirects, intact internal link structure, and preserved Core Web Vitals typically returns to baseline traffic within 30–45 days. A site with broken redirects or URL changes without documentation can take 120–180 days to recover, or may never fully recover if backlinks remain pointed at 404 errors.
Keyword ranking patterns follow a predictable arc during relaunch. In the first 48 hours post-launch, search engines encounter your new site for the first time. Rankings volatility is highest during this window: positions swing up and down as Google’s crawlers re-index pages and re-evaluate relevance signals. A page ranking in position 5 might drop to position 12 on day 2, then climb back to position 7 by day 5. This is normal.
Between days 3–21, volatility decreases and rankings tend to stabilise. If you have lost significant positions by day 7 (more than 10 positions on 30%+ of your tracked keywords), it signals a technical problem: broken redirects, crawlability issues, or duplicate content. These problems require immediate intervention.
By day 30, if the relaunch was executed correctly, 80–90% of your keywords should have regained their pre-relaunch positions. Lingering drops beyond day 45 suggest content changes, missing internal links, or Core Web Vitals regressions.
Crawl budget waste is silent and costly. Every redirect your site forces Google to follow costs crawl budget. If you have a redirect chain (old URL A redirects to temporary URL B, which redirects to final URL C), Google wastes crawl budget on two hops instead of one. On a large site with thousands of redirects, wasted crawl budget means new content is crawled more slowly and indexed later.
For example: a 10,000-page site relaunched with direct 301 redirects might consume 15,000 crawl requests over the first month as Google indexes new pages. The same site with 2-hop redirect chains might consume 35,000 crawl requests to achieve the same indexation, because Google burns budget following chains instead of discovering new content. That difference translates to new pages staying undiscovered for weeks longer.
How Search Engines Index Relaunch Scenarios
URL structure changes create a cardinality problem. When you change URL structure during a relaunch, you force Google to map old URLs to new URLs, understand that they are the same content, and transfer ranking authority. The mechanism that makes this work is the 301 redirect.
A 301 redirect tells Google: “This content has permanently moved to a new location. Update your index.” In principle, this is clean. In practice, several things go wrong:
- Redirect chains form: Developers create intermediate redirects for templating or staging reasons. Old URL A points to a temporary staging URL B, which points to the final URL C. Google follows all two steps, consumes crawl budget on both, and ranking recovery slows.
- Orphaned backlinks: Not all URLs get a redirect. Pages with valuable inbound links are deleted without a redirect destination, and those external links now point to 404 errors. The authority from those links is lost.
- Redirect timeout: Redirects take time to resolve. If a redirect server is slow or misconfigured, Google’s crawler times out before following the redirect, treats the old URL as a canonical 404, and stops crawling related pages on that domain.
If you preserve URL structure and do not change paths or query parameters, you avoid these issues entirely. Most relaunch SEO failures come from URL changes that were not technically necessary.
Internal link equity is redistributed based on what links exist post-launch. Every internal link on your site passes authority from the source page to the destination page. During a relaunch, internal links are usually rebuilt to match the new information architecture. This is where equity leaks silently.
Common internal-link mistakes:
- Unlinked high-value pages: Pages that ranked well are moved to the new site but not linked from the homepage or category pages. Without inbound internal links, those pages drop in rankings within 30–60 days.
- Broken anchor text: Internal links that used keyword-rich anchor text are rebuilt with generic text. Keyword relevance signals weaken, and rankings stall.
- Reduced link density: The new design has fewer internal links per page. High-performing sites have 5–10 internal links per page. A new design with aesthetic focus on negative space might drop to 2–3 links per page, reducing crawlability and authority flow.
The fix is mechanical: document every internal link on your old site, rebuild them to match old anchor text and destination logic on the new site, and test that link density and path depth remain consistent.
Duplicate content during migration confuses Google’s indexing. During the transition from an old site to a new one, both sites may be live and indexed at the same time. If both are fully crawlable and neither includes rel=canonical tags or redirects, Google sees two identical versions of your content competing in the index. This forces Google to choose which version is canonical, a process that can take 2–4 weeks and causes ranking volatility in the interim.
The duplicate-content problem is worse if:
- The old site’s robots.txt was not updated to block crawling during the transition.
- The new site includes a self-referential rel=canonical, but the old site does not include a rel=canonical pointing to the new site.
- You launch with a temporary redirect (302) instead of permanent (301), signalling to Google that the old version is still the primary.
The Window of Vulnerability
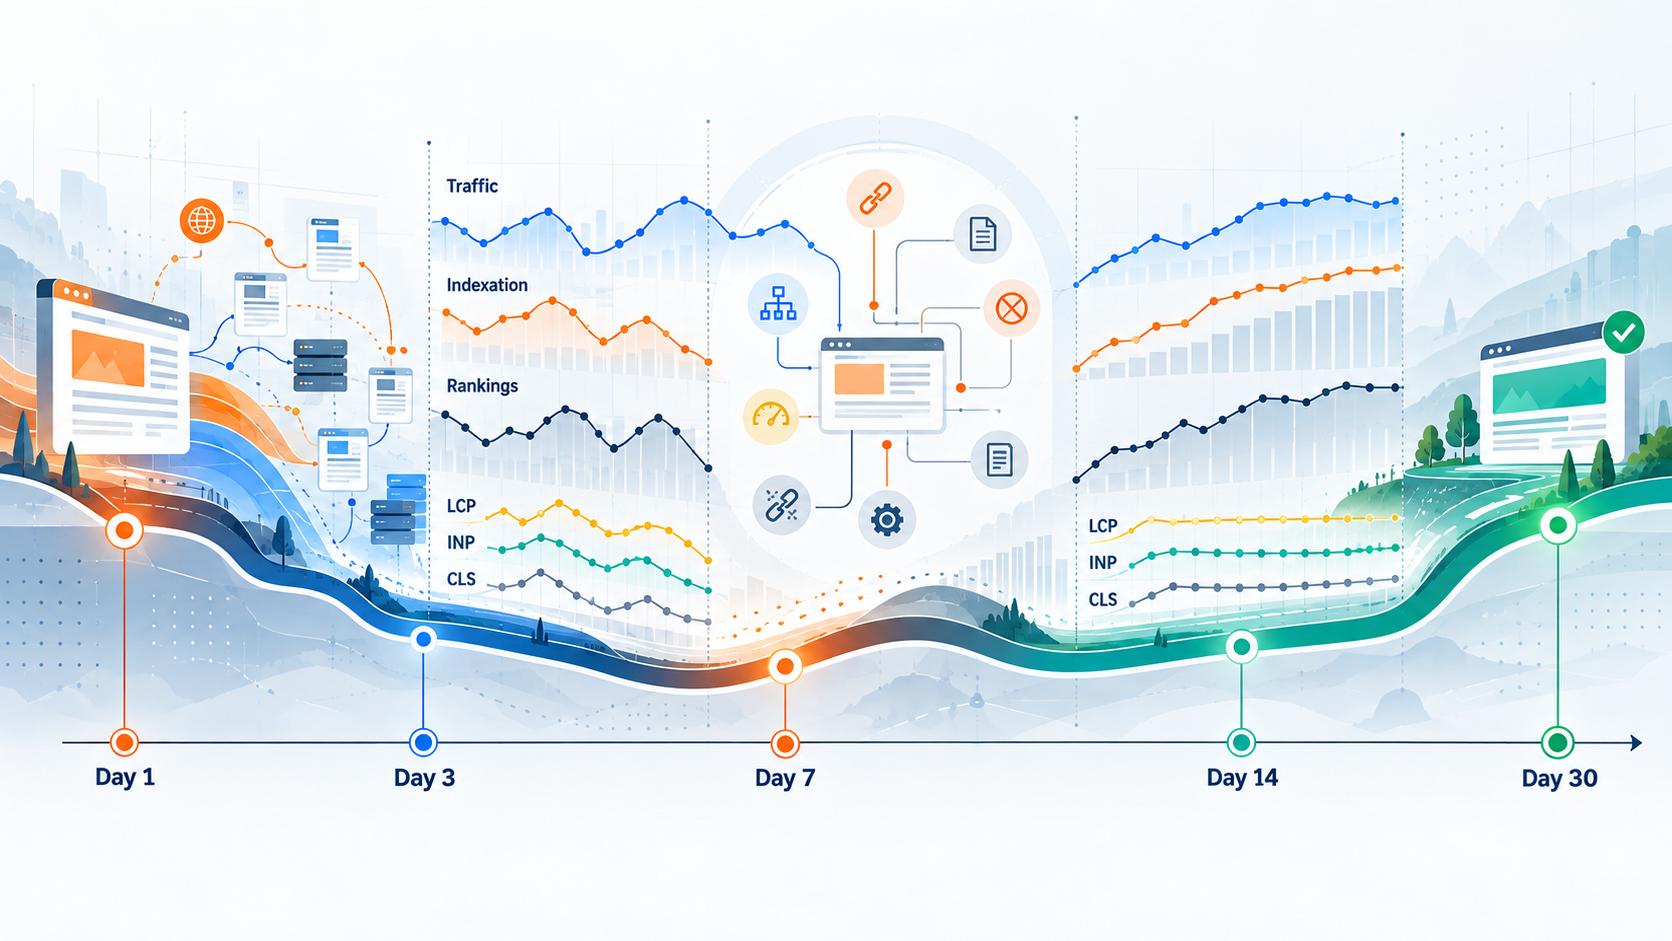
The first 30 days after launch is when your site is most vulnerable to ranking loss. Your site is most at risk during the 30 days surrounding launch.

- Days -3 to 0 (pre-launch): Final testing window. Any problems caught here can be fixed before traffic switches. Problems missed here become production incidents.
- Days 1–3 (launch window): Crawlers discover the new site for the first time. Indexation begins. Search rankings are most volatile. Technical problems cause the most damage during this window because Google is re-evaluating every page at once.
- Days 4–14: Secondary phase. Rankings stabilise around their true post-relaunch level. If a page is going to recover, most of that recovery happens here. Content issues or link problems become apparent.
- Days 15–30: Stabilisation phase. Volatility decreases. If you have not recovered by day 30, you have a structural problem that requires diagnosis and intervention.
Ranking volatility peaks on days 2–7. This is when Google recrawls your entire site at maximum intensity. On day 1, you might see crawl requests spike 5–10 times normal levels. Rankings shift dramatically: a page in position 10 might jump to position 3, then drop to position 18 by day 4. This is normal oscillation. Do not panic and make changes on day 2. Wait until day 7 to assess true damage.
Pages that drop more than 15 positions by day 7 have a problem: they were not properly redirected, they lost internal links, their content changed materially, or they have a technical crawlability issue.
Speed of implementation matters because search engines update their index asynchronously. If you spend two weeks gradually rolling out the new site, you extend the vulnerability window across those two weeks. During that time, Google crawls inconsistently. Some sections of your site are new, others are old. Canonicals, redirects, and robots.txt rules are inconsistent. Rankings suffer.
A fast, clean switch (execute all redirects within 4 hours during low-traffic times) creates a sharp indexing event that Google can process quickly and completely. Within 48 hours, Google has recrawled most of your site and established clear redirect paths. Recovery is faster.
Most SEO specialists recommend a “hard launch” (overnight switchover) rather than a phased rollout, despite the all-or-nothing risk. The phased approach extends pain; the hard launch concentrates it into 48 hours, after which recovery momentum is clear.
The Complete Pre-Relaunch SEO Audit Checklist
Before you touch code or design, you need a baseline. A relaunch without a documented pre-launch state is like changing your car’s engine without knowing the original fuel efficiency. You will have no way to measure what broke or what improved.
This section walks you through what to capture, how to capture it, and how to structure the data so that post-launch comparison becomes automatic rather than guesswork.
What You Must Document Before Launch
Your pre-launch audit serves two purposes: it identifies risk areas to address before going live, and it creates the comparison dataset you will lean on for the first 60 days post-launch.
Current rankings and traffic baselines by page and keyword
Export six months of data from Google Search Console before you make any changes. You need impressions, clicks, average position and CTR for every page that receives organic traffic. Do not rely on memory or a summary report. Export the raw data into a spreadsheet.
For your top 50 keywords by traffic volume, take screenshots of their current SERP position on the date of export. Use a tool like SEMrush, Ahrefs or Moz to capture historical rank data from a consistent date (e.g. first of the month). Rank-tracking tools require baseline data from the same date before and after launch, so consistency matters.
Organise this by page URL. For each page, list:
- Current URL
- Primary target keyword
- Secondary keywords it ranks for
- Current average position
- Monthly search volume
- Monthly organic clicks
URL structure, internal linking topology, and anchor-text distribution
Use Screaming Frog to crawl your entire existing site. Export the internal links report. This shows you how many internal links point to each page and what anchor text is used.
Audit anchor-text distribution: if you have 300 internal links and 200 of them say “click here” or “learn more”, you have poor anchor-text signal. If 150 say your target keyword, you may be over-optimised. Document the distribution so you can replicate it (or improve it) in the new site.
List your URL structure rules. For example:
- Homepage: /
- Blog posts: /blog/[slug]/
- Category pages: /[category]/
- Products: /shop/[product-slug]/
This becomes your redirect mapping template.
Metadata inventory: title tags, meta descriptions, schema markup
Export all title tags and meta descriptions from your live site using Screaming Frog or a custom script. You need one row per URL. Include any H1 tags as well, since these inform content structure in the new site.
For schema markup, use Google’s Rich Results Test on 10–15 representative pages across different content types. Document:
- Which structured-data types are currently in use (Organisation, Article, Product, BreadcrumbList, etc.)
- Any validation errors or warnings
- Which rich results are currently displaying in search
This prevents accidental schema loss during migration.
Core Web Vitals scores and technical baseline
Run the entire site through Google PageSpeed Insights and record:
- Largest Contentful Paint (LCP) score and milliseconds
- First Input Delay (FID) or Interaction to Next Paint (INP) score and milliseconds
- Cumulative Layout Shift (CLS) score and unitless number
Also capture CrUX (Chrome User Experience Report) data from Google Search Console under Experience > Core Web Vitals. This is real-user data, more important than lab data.
Screenshot the results. Post-launch, you will compare these exact metrics to prove whether performance improved or regressed.
Backlink profile and referring domain analysis
Export your backlink profile from Ahrefs, SEMrush or Moz. You need:
- Total number of backlinks
- Number of referring domains
- Top 20 referring domains by authority
- Pages with the most backlinks
- Anchor-text distribution of backlinks
Pay special attention to branded vs. non-branded anchors. If you have thousands of “click here” backlinks and few keyword-rich anchors, your backlink profile is weak. If your backlink profile is weak, a relaunch is a risk you must manage carefully.
Crawlability assessment: robots.txt, sitemap structure, blocked resources
Check your live robots.txt file. Note any paths you are blocking from crawl (often /admin/, /test/, /temp/). In the new site, you will replicate these blocks to prevent wasting crawl budget on non-public pages.
Export your XML sitemaps. How many URLs are listed? How are they organised? Search engines will use your new sitemap post-launch to discover pages, so this structure matters.
Run Screaming Frog with JavaScript rendering enabled. Check whether critical resources (CSS, JavaScript, images) are loading. If your site blocks resources in robots.txt, search engines cannot see them. Document any blocked resources that should be crawlable.
Tools and Methods for Baseline Capture
You do not need every tool on the market. You need one rank-tracking tool, access to Google Search Console, and Screaming Frog.
Google Search Console data export
Go to Search Console > Performance. Set the date range to the past six months. Click the download icon and export clicks, impressions, CTR and position by page.
Do this download twice: once by page (to see which pages drive traffic) and once by query (to see which keywords drive traffic). Save both files with the export date clearly labelled (e.g. “GSC_2024-01-15_by_page.csv”).
If you have conversion tracking set up in GSC, export that too. This tells you which pages drive not just traffic but business outcomes.
Screaming Frog crawl of existing site
Install Screaming Frog. Point it at your live site’s homepage. Start a crawl. Let it run until it finishes (this may take 30 minutes to several hours depending on site size).
Export the internal links report. This is critical for understanding link distribution. Export the list of all crawled URLs so you have a master inventory.
If your site has noindex directives or pages blocked by robots.txt, Screaming Frog will tell you which ones. Document these so you can decide what to do with them in the new site.
Third-party rank tracking from consistent dates
Pick one rank-tracking tool (Ahrefs, SEMrush, Moz) and create a project for your site. Add your top 50–100 keywords, or all keywords with search volume over 20. Let the tool crawl and rank-check your site. This may take 24 hours.
The key is consistency: the tool must re-check these exact keywords on the same date each month (or week, if you prefer weekly tracking). This is how you will measure whether rankings went down post-launch.
If you do not have a rank-tracking tool, use Google Search Console data alone. GSC shows average position across all keywords each page ranks for, which is sufficient for monitoring.
Custom spreadsheet template for side-by-side comparison
Create a master spreadsheet with these columns:
| Old URL | New URL | Target Keyword | Old Ranking Position | Old Monthly Clicks | Old LCP Score | Notes |
|---|---|---|---|---|---|---|
| /blog/topic | /resources/topic | “topic guide” | 5 | 847 | 2.1s | Content unchanged |
Leave the “New” columns empty for now. Populate this sheet fully before launch. Post-launch, you will fill in the new data and calculate deltas.
Use conditional formatting to highlight rows where metrics change by more than your acceptable threshold.
Screenshot documentation of current SERP positions
For your top 20 keywords, take a screenshot of the SERP showing your current position. Label each screenshot with the keyword, date and your current position. Store them in a folder. After launch, take new screenshots on the same date each week.
Creating Your Post-Relaunch Comparison Framework
Data collection is only half the battle. You also need rules: what counts as “recovery” and what counts as “failure”.
Define acceptable variance thresholds
Before launch, decide: what drop in traffic is acceptable? What ranking shift is acceptable? What delay in indexation is acceptable?
For example:
- Organic traffic drop: accept 5–10% in week 1, return to baseline by week 4
- Ranking drop: accept 3-position average shift in week 1, recover 50% of drop by week 2
- Indexation: expect 50% of new URLs indexed by day 3, 90% by day 7
Write these down. Share them with your team. When you hit day 3 and only 20% of URLs are indexed, you will already know this is a red flag and needs investigation.
Set daily monitoring schedule
Week 1 post-launch: Check GSC, Analytics, rank tracker and uptime monitoring daily. Aim for the same time each day so you spot trends.
Weeks 2–4: Check three times weekly. You are looking for stabilisation rather than live firefighting now.
Month 2 onwards: Check weekly. By this point, most problems have surfaced.
Document this schedule and assign it to a person.
Assign accountability for tracking and escalation
Decide now: if organic traffic drops 20% on day 2, who gets alerted? Who investigates? Who fixes it? Who communicates to stakeholders?
Create an escalation document:
| Alert | Threshold | Owner | Action |
|---|---|---|---|
| Traffic drop | 20% below baseline | SEO manager | Check GSC coverage, crawl errors; escalate to dev if 4xx spike |
| No new URLs indexed | 0% after 72 hours | Developer | Check robots.txt, noindex, XML sitemap |
| Ranking drop | 30%+ of keywords drop 5+ positions | SEO manager | Audit title tags, canonicals, keyword mapping |
| Core Web Vitals regression | LCP >3s or CLS >0.15 | Developer | Profile page load; compress images; defer JS |
Share this with your entire relaunch team before launch day.
URL Strategy: Mapping, Redirects and Canonicals
Your URL structure is the backbone of SEO recovery during a relaunch. Get this wrong, and you can spend six months regaining what you lost. Get it right, and your site recovers in 30 to 45 days.
This section walks you through three critical decisions: whether to change your URLs at all, how to map old pages to new ones, how to implement redirects correctly, and when to use canonical tags.
Deciding: Keep URLs or Change Them?
The safest choice is to keep your URL structure intact. If your old URLs work, leave them alone. Every URL you change requires a redirect, and every redirect costs crawl budget and introduces a small ranking delay.
But sometimes URL changes are worth the recovery cost.
Keep your current URLs if your existing URLs are already clean, keyword-relevant and aligned with your information architecture. Changing them buys you nothing. A URL like /blog/seo-best-practices does not need to become /resources/how-to-optimise-seo. The first version is already doing its job.
Change your URLs if your current URLs are keyword-stuffed, non-descriptive, or misaligned with your new site structure. A rebranding effort often justifies URL migration. Moving from /blog/topic to /resources/topic makes sense if your new information architecture genuinely separates these sections.
Real example: A SaaS company relaunched with a new product tier structure. Their old URLs followed a customer journey model (/starter-plan, /pro-plan) but the new site organised pages by use case (/plan-for-small-teams, /plan-for-enterprises). The URL change reflected a real change in how customers navigate the site. The company planned for a 60-day recovery window, invested in a detailed redirect map, and returned to baseline traffic by week seven.
Cost-benefit calculation: Each URL change costs approximately 7 to 14 days of ranking recovery time per page. A high-traffic old URL with strong backlinks loses more time than a low-traffic page. If you change 100 URLs, you are banking on the new URL structure delivering enough UX or SEO improvement to justify losing 2+ weeks of rankings across your site.
If your old URLs are fine, the cost does not justify the benefit. Keep them.
Building Your URL Mapping Spreadsheet
Before you move a single URL, build a spreadsheet that maps every old URL to its new destination. This becomes your reference document during implementation and your checklist during post-launch monitoring.
The spreadsheet must include these columns:
| Column | Purpose | Example |
|---|---|---|
| Old URL | Full path on live site | /blog/seo-for-ecommerce |
| New URL | Destination after relaunch | /resources/seo-ecommerce-guide |
| Status Code | 301 or 302 | 301 |
| Redirect Priority | Week 1, Week 2, Orphaned | Week 1 |
| Traffic (monthly) | From your analytics baseline | 1,247 visits |
| Keyword(s) | What this page ranks for | “SEO ecommerce”, “optimise ecommerce site” |
| Notes | Consolidation, deletion, or changes | Consolidated with /seo-ecommerce-stores |
One-to-one mapping requirement: Every old URL must have exactly one new destination. Do not leave the mapping ambiguous. “Direct old blog post to homepage” is not a redirect strategy; it is a traffic loss strategy.
If a page is deleted and you have no direct replacement, create a redirect to the most relevant category page or resource hub. If multiple old pages are being consolidated into one new page, that is acceptable, but document it clearly and watch for traffic loss.
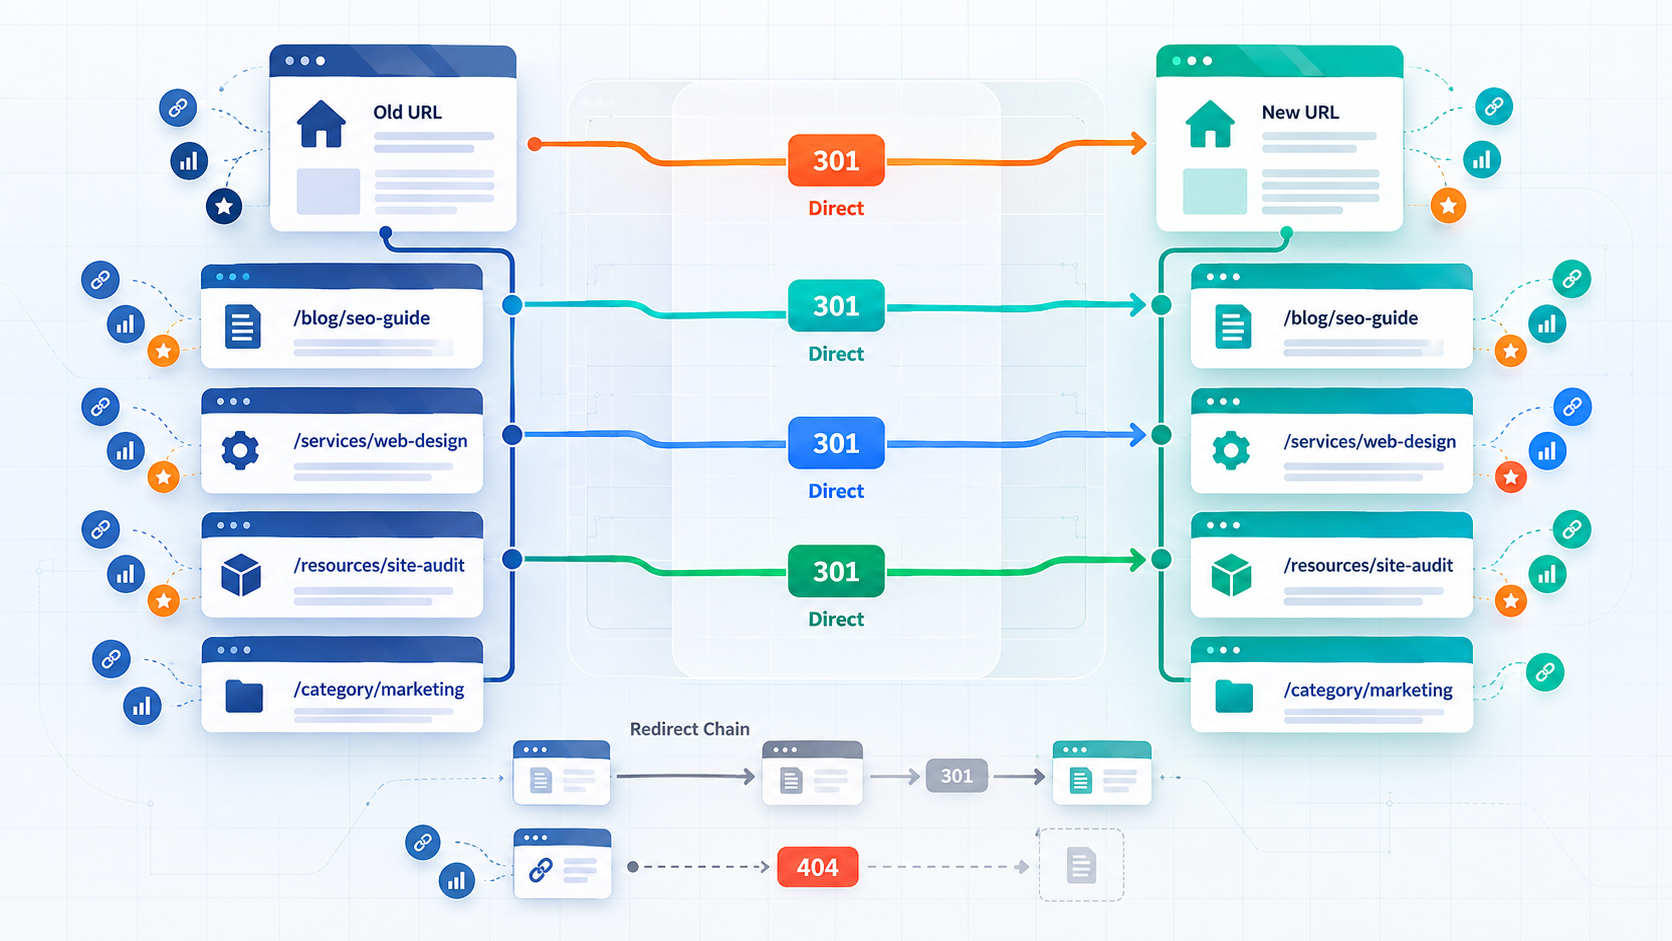
Status code assignment: Use 301 (permanent redirect) for all content you are keeping. A 301 tells search engines that the page has permanently moved. Google will update its index, transfer approximately 90-99% of the link authority from the old URL to the new one, and begin ranking the new URL instead.
Use 302 (temporary redirect) only if you are genuinely unsure whether the change is permanent. In practice, during a relaunch, there is no such thing as a temporary URL change. Use 301 for everything.
Redirect priority: Not all redirects are equal. Prioritise in this order:
- Homepage (implement first, test immediately)
- Top 50 high-traffic pages (implement in week 1 before launch)
- Medium-traffic pages (implement by launch day)
- Low-traffic, orphaned pages (can wait until week 2 if necessary)
This prioritisation ensures your most visible, most valuable pages redirect correctly while you verify your redirect infrastructure works.
Orphaned content identification: An orphaned page is one with traffic or backlinks but no redirect destination. Export all pages from your old site, cross-reference against your redirect map, and flag anything without a destination. Decide immediately: redirect it to a category page, a similar piece of content, or mark it for a 404 status. Do not leave orphaned pages to chance.
Use Screaming Frog or your analytics platform to find these gaps. A single missed redirect can cost 200 to 500 visits per month if that page had traffic.
Redirect Implementation Standards
Implementing redirects incorrectly is nearly as damaging as having no redirects at all. The standards below ensure that crawlers find the right page, follow it efficiently, and transfer authority without delay.
Server-side redirects beat all alternatives. A 301 redirect served by your web server is processed before the browser receives any HTML. It is fast, reliable, and unambiguous. Search engines follow it immediately.
Meta refresh redirects and JavaScript redirects are slower and less reliable. They require the browser to download the page, parse it, and then follow the redirect. Search engines may ignore them or treat them as a delay signal. Avoid both.

Avoid redirect chains at all costs. A redirect chain looks like this: Old URL A redirects to temporary URL B, which redirects to final URL C. The crawler has to follow two hops instead of one, burning crawl budget and delaying authority transfer.
Test your redirect implementation before launch to catch chains. Use a redirect checker tool (Redirect Path extension for Chrome, Screaming Frog Redirect Chain Detector, or MXToolbox Redirect Tracer) and verify that every old URL points directly to its new destination in a single hop.
If you find chains, fix them immediately. Update your redirect configuration so Old URL A points directly to final URL C.
Test redirects on staging before launch. Before you go live, test every redirect on your staging server. Check three things:
- Does the old URL return 301 (not 302, 307, or others)?
- Does the redirect land on the correct new URL?
- Does the redirect complete in under 200 milliseconds?
Use an automated testing approach. Export your URL map as a CSV, write a script (or use an online tool) to check each redirect, and flag any failures. Fix them before launch day arrives.
Create a redirect test matrix:
| Old URL | Expected New URL | Status Code | Response Time (ms) | Destination Verified | Passed |
|---|---|---|---|---|---|
/blog/seo-basics |
/resources/seo-basics |
301 | 145 | Yes | ✓ |
/product/blue-widget |
/products/blue-widget-pro |
301 | 178 | Yes | ✓ |
/about-us/team |
/company/our-team |
301 | 156 | Yes | ✓ |
Document this before launch. On launch day, spot-check 10 to 15 redirects from the list to confirm the server is serving them correctly.
Server-side implementation: For Apache (htaccess):
RewriteEngine On
RewriteRule ^blog/old-post-title$ /blog/new-post-title [R=301,L]
RewriteRule ^old-page$ /resources/new-page [R=301,L]
For Nginx:
server {
    rewrite ^/blog/old-post-title$ /blog/new-post-title permanent;
    rewrite ^/old-page$ /resources/new-page permanent;
}
Ask your hosting provider or developer to implement these using server-level configuration, not JavaScript or meta tags.
Canonical Tags in Relaunch Scenarios
Canonical tags tell search engines which version of a page is the “authoritative” one when duplicates exist. During a relaunch, canonical tags serve specific purposes: managing potential duplicate content during transition, and signaling after launch.
Post-launch canonical best practice: self-referential canonicals on new URLs. After your site is live, every page should contain a self-referential canonical tag pointing to itself.
<link rel="canonical" href="https://example.com/resources/seo-basics">This is not strictly necessary, but it removes ambiguity and is considered best practice. If you have ever split content across multiple URLs or syndicated content elsewhere, a self-referential canonical protects you.
Temporary cross-domain canonicals during parallel indexing (rare, risky). If you run both the old and new site live for a transition period, you may have duplicate content across both domains. One approach is to use a canonical tag on the old domain pointing to the new domain:
<!-- Old site page -->
<link rel="canonical" href="https://newsite.com/resources/seo-basics">
This tells Google to treat the new site page as authoritative and deprioritise the old one. However, this approach is risky. If the old canonical directive is cached or misread, you can accidentally suppress the new site from ranking while the old site stays visible.
Google’s preferred approach for parallel indexing is to use 301 redirects, not cross-domain canonicals. Canonicals work slower than redirects, and they do not consolidate authority as effectively.
When NOT to use canonicals: Do not place a canonical tag on the old URL redirecting to the new one. This creates conflicting signals. The 301 redirect says “move here”, and the canonical says “rank this instead”. Canonicals process slower than redirects, so the redirect wins, but Google has to resolve the contradiction. This delays authority transfer by 1 to 3 days.
Remove canonicals from old-site pages before launch. Once the old site is archived, canonical tags become irrelevant anyway.
Canonical during content consolidation: If you are merging two old pages into one new page, add a canonical on each old page pointing to the new consolidated page during the transition period. Then implement 301 redirects after you confirm the consolidation is working:
- Week 1: Old pages A and B carry canonicals pointing to new page C.
- Week 2: After confirming Google understands the consolidation, add 301 redirects from A and B to C.
This staged approach reduces the risk of accidentally hiding one of the old pages. But it is slower. If you are confident in your content audit, implement 301 redirects directly and skip the canonical step.
Preserving Link Equity and Internal Link Structure
Link equity is what carries your SEO authority from the old site to the new one. Without a strategy to preserve it, a relaunch becomes a reset: you lose not just traffic, but the search-engine credit you have spent months or years building.
How Link Equity Flows Through Redirects
A 301 redirect is not a perfect pass-through. When Google crawls an old URL and finds a 301 to a new one, the search engine transfers authority from the old page to the new one. Research and industry measurement suggest this transfer is approximately 90–99% of the original PageRank, though the exact percentage depends on crawl budget, site structure and other factors.
The key insight is this: every redirect hop costs crawl efficiency and slows authority transfer.
If your old page redirects to an intermediate URL, which then redirects to the final destination, you have created a redirect chain. Google must follow three requests instead of one. That extra crawling consumes crawl budget that could go toward indexing new content. More importantly, each additional hop introduces a small decay in authority passed forward.
A direct 301 redirect (Old URL to New URL) transfers authority in one request. A two-step chain (Old URL to Staging URL to New URL) requires three requests and loses marginal authority at the second hop. Chains of three or more steps risk being abandoned by crawlers altogether if they timeout or exceed crawl depth limits.
Redirect chain impact on recovery timeline: Each hop in a redirect chain adds approximately 3 to 7 days to ranking recovery per page. A site with 1,000 pages and average 1.5-hop chains across them will recover 3 to 7 days slower than a site with direct 1-hop redirects. Scale that across 5,000 pages and you are looking at 2 to 4 weeks of additional recovery time.
This is why testing redirects before launch is non-negotiable. A redirect chain discovered on day 3 post-launch has already cost you a week of recovery momentum on every affected page.
Backlink Continuity and 404 Risk
Every external link pointing to your old site is a vote of confidence in that URL. When you launch a new site, those links must still work, or you lose their authority and create a poor user experience for visitors coming from external sources.
Orphaned backlinks are a silent ranking killer. An orphaned backlink is an external link pointing to a page that no longer exists and has no redirect. The user lands on a 404 error page. Google crawls the 404, recognises the old URL as dead, and removes it from the index. The authority from that backlink is lost.
Finding orphaned backlinks requires cross-referencing two datasets: your backlink profile from a tool like Ahrefs, and your URL mapping spreadsheet.
Process:
- Export your backlink list from your SEO tool. Include every referring URL and the destination URL it links to.
- Cross-check destination URLs against your URL mapping. Flag any destination URL that does not appear in the mapping.
- For each flagged URL, decide: is there a relevant new page to redirect to? If yes, add it to your mapping with a 301 redirect. If no, document it as “to be redirected to [category page]”.
- Note in your redirect map which pages have external backlinks. Prioritise these for testing, as they carry measurable value.
A 2,000-page site typically has 50 to 200 URLs with inbound backlinks. These are your highest-value redirect targets.
Internal Link Architecture: Rebuilding Authority Flow
Internal links are how you distribute authority across your site. During a relaunch, your internal link structure often changes to match the new design and information architecture. If you reduce internal links, change anchor text, or fail to link to high-value pages, your authority distribution becomes inefficient and rankings drop.
Link density baseline: Most well-optimised sites have 5 to 10 internal links per page on average. This includes footer links, navigation links, and in-content links. A page with only 1 or 2 internal links is under-linked and will rank below a similarly well-written page with 5 to 8 internal links.
During relaunch, measure your old site’s internal link density. In your new site, maintain or increase it. If your new design is minimalist and uses only 2 to 3 internal links per page, you have made a trade-off that will cost rankings.
High-value page linkage: High-traffic, high-ranking pages need more internal link support than low-traffic pages. These pages should have multiple internal links pointing to them from different sources (homepage, category pages, related-content sections).
Create a link-priority list for your new site:
| Page Title | Traffic (monthly) | Priority Level | Minimum Internal Links Required | Link Sources |
|---|---|---|---|---|
| Homepage | 5,000+ | Critical | 8-12 | Navigation, footer, related content |
| Top Blog Post | 2,500 | High | 6-8 | Homepage, category page, footer |
| Product Page | 800 | Medium | 4-6 | Category page, homepage (if featured), footer |
| Archive Page | 150 | Low | 2-3 | Category page, footer |
Build this map before development starts. Share it with your design and development team so they understand the link requirements of each page type.
Anchor text consistency: Preserve old anchor text where possible. If your old site has a internal link that says “SEO best practices” pointing to /blog/seo-practices, and your new site has the same page but the internal link now says “learn more”, you have weakened the keyword signal.

During the content audit phase, document anchor text distribution. In your new site, aim to recreate the same distribution. This is not about over-optimisation, but about maintaining the relevance signals you have already built.
Breadcrumb navigation is an underrated internal link tool. Breadcrumbs serve two purposes: they help users understand where they are in your site structure, and they provide internal links that help distribute authority to category and parent pages.
A breadcrumb on a deep page like /blog/category/seo/seo-best-practices might look like:
Home > Blog > SEO > SEO Best PracticesThis structure passes authority from the deep page back to the category page (/blog/category/seo) and to the parent page (/blog). If your new site removes breadcrumbs, you lose these internal link signals.
Include breadcrumbs in your new site, especially on category and deep-content pages. Ensure they are implemented with Schema markup (BreadcrumbList structured data) so search engines recognise them.
Related-Content and Contextual Links
“Related posts” sections, “Next article” links, and contextual in-content links are high-value internal link opportunities. They keep users on your site longer, distribute authority, and signal content relationships to search engines.
During a relaunch, these sections often get redesigned. If your old site had a “Related Posts” widget with 5 links, and your new site has a “You might also like” section with 3 links, you have reduced internal link opportunity by 40%.
Before launch, decide: how many related-content links will your new design display? For blog posts, recommend 3 to 5 related articles. For product pages, recommend 3 to 5 related products or category pages. For category pages, recommend 4 to 6 featured subcategories or top products.
Make sure the related-content algorithm (manual or automatic) prioritises pages by traffic and keyword relevance, not just recency. A “Latest Posts” section that ignores your top-performing content dilutes your authority distribution.
Technical SEO Setup for the Relaunch
Technical SEO is the foundation that everything else rests on. A relaunch with poor technical setup will struggle to recover even if redirects are perfect and content is unchanged.
Core Web Vitals: Non-Negotiable Performance Requirements
Core Web Vitals are three metrics that measure user experience: Largest Contentful Paint (LCP), Interaction to Next Paint (INP), and Cumulative Layout Shift (CLS). Google has confirmed these are ranking factors. A relaunch that improves performance gains rankings; one that degrades performance loses them.
Largest Contentful Paint (LCP) target: under 2.5 seconds on mobile. LCP measures how long it takes for the